Tuesday, April 12, 2011

Assignment 2

Hi ho, today I will show how I did my second assignment which is the Dynamic Poster.


Firstly, I start out by creating a new file which is Flash ActionScript 3.0


As a new file is created, I edited its size to match the requirement which is 320 X 240 pixels. I put it in a vertical position.


Next, I imported my first assignment PSD file to the library. This way I can manage the layers better.


I checked the layers of the PSD file and checked the option at the bottom. Then, I clicked OK.


After that I dragged the Background layer to the stage to place it. I did the same with all the layers to place them on stage.


In the first layer which I made movement, firstly I inserted frames up til the chosen frame.


Then, I right-clicked on the layer and selected Create Motion Tween to make movement.


I inserted a keyframe in the frames of the layer to the point where I want the text to make its next stop after moving. Then I moved the text to another position to create a simple movement.


To make a fade in and fade out effect, I used the color effect on the text. But this must be done after converting the text into a symbol. This can be done by pressing F8. I used Alpha and changed the opacity from 0% to 100% for a fade in effect and vice versa for a fade out effect.


To make a movement of rotation, firstly I clicked on the frames of the layer I want to rotate and select Create Motion Tween. Then, I selected Free Transform and rotate the text when the symbol appears as shown.


I also made a skew effect by changing slightly the shape of the text. This can be done with Classic Tween.


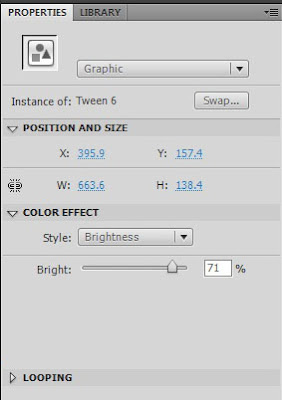
For a brightness effect, it is similar to the alpha effect.


For the final bit of animation, I placed the entire contents of the faces and used Classic Tween to move and change their shapes.

Saturday, March 5, 2011

Redone Assignment 1


Ohayo gozaimasu. Well, I redid my 1Malaysia project because I wasn't satisfied with the previous one. I chose to do the theme Face.
So here are the steps.


First, I created a new file with Adobe Illustrator which I will transfer to Adobe Photoshop later. The size is International Paper A4.


Then, I went to File>Place to place a picture to trace.


I used the pen tool to make a lineart around the man's face.


The final product looks like this without the picture.


After that, I put in some text. The first thing I did was to do a path with the pen tool following the shape of the cap. And then, I used the Type on a Path tool located in the Type tool.


I used the free transform tool to change some of the letters' shape and size to fit in the shape of the cap. Firstly, I right-clicked on the text and selected Create Outline. Then, I used the direct selection too (shortcut is A) to change the letter's shape freely with the free transform tool (shortcut is E)

The direct selection tool circled in green while the free transform tool circled in red.


The final result of the type process looks like this.


I saved the files according to each layers that I did. I clicked on the eye on the layers panel to make the rest of the layers invisible so that I can save the AI file with just one layer showing. This is to make sure that I have separate parts to transfer to the Adobe Photoshop file.


The next step that I did was to create a new Photoshop file with the International Paper size, A4, the same with the Adobe Illustrator file.


While the new PSD file is opened, I open the AI file from before one by one, starting with the lineart as a guide to place the text in my poster. I used the Move tool to transfer the AI file onto the new PSD file.


I renamed the newly transferred file to make it easier.


After I transferred all the AI files that saved, I created group folders in the layers panel to sort the layers out to organize them and enable me to work much better.


I locked the transparent pixels of each layer. This is so that I can change the content of the layer without affecting the other layers but just the content of the layer selected itself.


I unlocked the layer of the background by double clicking on the layer while pressing Alt on the keyboard.


To color the text, I used the brush tool. I chose a large brush size with a 100% hardness.


Since I locked each layer's transparent pixel, when I colored the text on the layer, it won't affect the other layers, thus only coloring the text on the layer itself. The result is this.


I clicked on the BG layer and the selected all by pressing Ctrl+A on the keyboard. I used the paint bucket tool (shortcut is G) to set a color for the background which is black.


I used the blending option to add some life to some of the text with outer glow or drop shadow. Mind you, I didn't use it on all as this would be overdoing it.


After that, I used the Type tool to type out a new text.


Then, I opened a JPEG file which I traced a flag earlier. Firstly, I went to the flag file and selected all. Then, I went to Edit>Copy.


I went to the poster file and clicked on the text file while pressing Alt. This made a selection on the text. I went to Edit>Paste Into to put the image of the flag into the text.


I added texture to the background. Firstly, I placed a texture file from this link, http://www.flickr.com/photos/liek/2440681764/

then I moved the BG layer above the texture layer and decreased its opacity.


After a bit of editing to some layers like changing the shape of the smile layer into more of a real smile and changing the colors and adding blending options, the final result is this.

So that is my 1Malaysia poster. :)